Airship is an app experience platform that lets you create and deliver powerful in-app experiences with the help of engaging, personalized content and actionable customer insights.
RudderStack supports Airship as a destination to which you can seamlessly send your event data.
Getting started
Before configuring Airship as a destination in RudderStack, verify if the source platform is supported by referring to the table below:
| Connection Mode | Web | Mobile | Server |
|---|---|---|---|
| Device mode | - | - | - |
| Cloud mode | Supported | Supported | Supported |
Once you have confirmed that the source platform supports sending events to Airship, follow these steps:
- From your RudderStack dashboard, add the source. Then, from the list of destinations, select Airship.
- Assign a name to your destination and click Next.
Connection settings
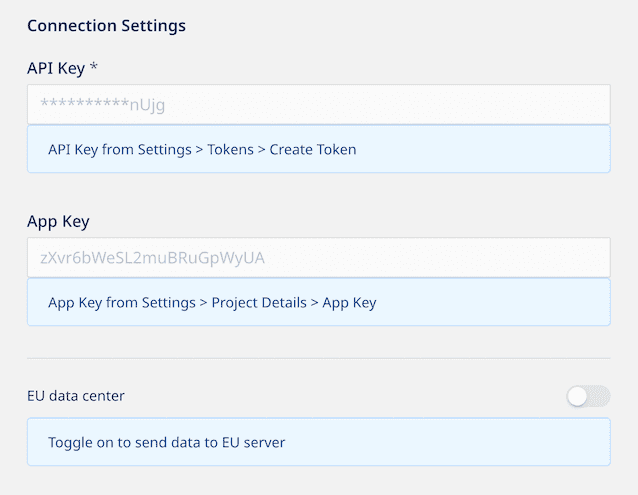
To successfully configure Airship as a destination, you will need to configure the following settings:

- API Key: Enter your Airship token which is required by RudderStack to communicate with your Airship project and authenticate all the supported event calls, that is,
identify,track, andgroup.
- App Key: Enter your Airship project's app key which is required for the
trackcalls. You can obtain the app key by going to Settings > Project Details in your Airship dashboard.
- EU data center: Enable this setting if you've implemented your app in Airship's European data center.
Identify
The identify call lets you uniquely identify a user and record any associated traits about them like their name, email, etc.
A sample identify call is shown below:
rudderanalytics.identify("1hKOmRA4el9Zt1WSfVJIVo4GRlm", { likes_movies: true, favorite_color: "purple", age: 13});In the above code snippet, RudderStack sends the Boolean values to Airship as tags, whereas the non-Boolean values are sent as attributes.
Tags
To successfully assign tags to Airship using the RudderStack identify events, you must create a tag group with the group key set to rudderstack_integration in Airship.
This integration supports identify traits of type Boolean only. Airship adds tags for the traits that are set to true and removes tags for the traits set to false.
Attributes
For identify traits that are not mapped to any predefined or custom-defined Airship attributes, you must create and enable those attributes in the Airship dashboard.
Track
The track call lets you capture user events along with the properties associated with them.
RudderStack sends the track events to Airship via their Custom Events API. You can use the event properties to personalize and trigger specific messages for your audience.
track calls.A sample track call is shown below:
rudderanalytics.track("Product Clicked", { description: "Shoes viewed", brand: "Sneakers", colors: ["red", "blue"], items: [{ text: "New Balance Sneakers", price: "$69.95", }, { text: "G.I. Joe Sneakers", price: "$99.95", }, ],});The event name sent to Airship must not contain any upper case characters. Otherwise, it is rejected with a 400 status code. RudderStack handles this by converting any upper case characters to lower case and replacing any spaces with an underscore(_).
In the snippet above, the event name Product Clicked is automatically converted to product_clicked before sending to Airship.
Group
The group call lets you link an identified user with a group such as a company, organization, or an account, and record any traits associated with that group, e.g., company name, number of employees, etc.
A sample group call is shown below:
rudderanalytics.group( { userId: "1hKOmRA4el9Zt1WSfVJIVo4GRlm", likes_movies: true, age: 13, });In the above code snippet, RudderStack sends the Boolean values to Airship as tags, whereas the non-Boolean values are sent as attributes.
This integration supports group traits of type Boolean only. Airship adds tags for the traits that are set to true and removes tags for the traits set to false.
group events, you must create a tag group with the group key set to rudderstack_integration_group in Airship. Similarly, you need to create the relevant attribute identifiers in Airship to set the attributes on the named users.Supported mappings
RudderStack maps the following event properties to the Airship properties before sending them over to Airship.
| RudderStack property | Airship property | Presence |
|---|---|---|
userId | named_user_id | Required |
event | name | Required |
properties | properties | Optional |
value | value | Optional |
interactionId | interaction_id | Optional |
interactionType | interaction_type | Optional |
sessionId | session_id | Optional |
transaction | transaction | Optional |
timestamp | occurred | Optional |
Traits mapping
| RudderStack trait | Airship attribute |
|---|---|
address.city | city |
address.country | country |
address.postalcode | zipcode |
address.state | region |
createdAt | account_creation |
firstName | first_name |
lastName | last_name |
name | full_name |
phone | mobile_phone |
FAQs
Where can I obtain the Airship API key?
The Airship API key is required so that RudderStack can communicate with your Airship project. This is a mandatory field to set up the integration.
To obtain your Airship project's API key, follow these steps:
- In your Airship dashboard, go to Settings.
- In the Project configuration window, go to Tokens and click Manage.
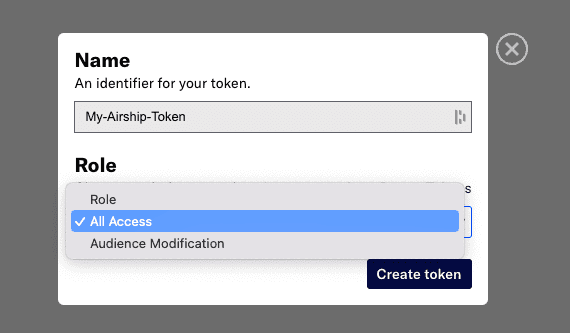
- Then, click Create token.
- Assign a name for your token. Under Role, select All access from the dropdown, as shown:

- Once the token is created, copy and secure the credentials and click Got it.
Where can I obtain the Airship App Key?
To obtain your Airship project's app key, follow these steps:
- In your Airship dashboard, go to Settings.
- In the Project configuration window, look for the Project Details pane on the right side.
You will find your project's app key listed here.
How do I create a custom tag group in Airship?
To create a tag group in Airship, follow these steps:
- Go to Settings > Project configuration > Tag Groups and click Manage.
- Click Create Tag Group and enter the following settings:
- Name: Enter the name for the tag group.
- Description: Set additional information about the tag group in this field.
- Group Key: Assign a unique ID for the tag group in this field. For example, to assign tags using the RudderStack
identifyevents, you can set this torudderstack-integration. For assigning tags using thegroupevents, set this torudderstack-integration-group.
For more information, refer to the Airship documentation.
How do I create and enable attributes in Airship?
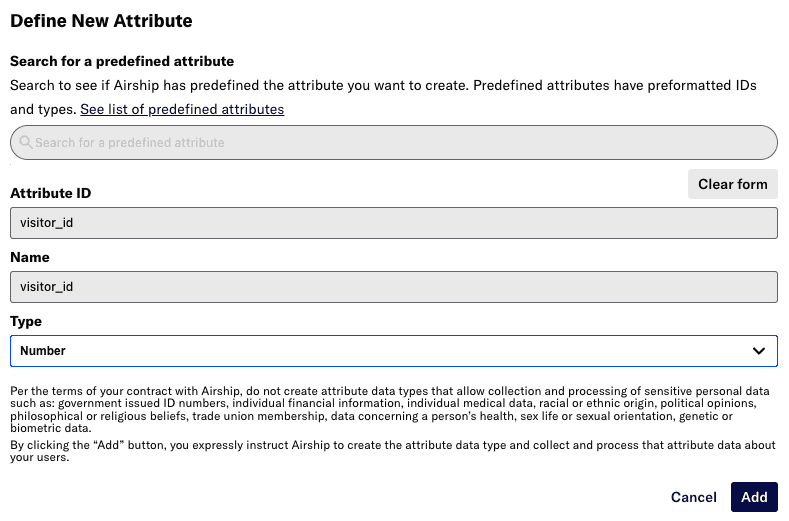
For identify traits that are not mapped to any predefined or custom-defined Airship attributes, you must create and enable those attributes in the Airship dashboard. To do so, follow these steps:
- Go to your Airship dashboard.
- Navigate to Audience > Attributes.
- Click Create Attribute.
- Enter the Attribute ID, Name, and select the attribute Type.
- Finally, click Add.

Contact us
For more information on the topics covered on this page, email us or start a conversation in our Slack community.